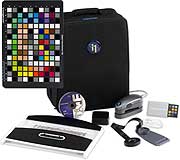
The X-Rite i1Photo system delivers all the tools necessary to implement an effective, predictable and accurate color-managed digital workflow in either RGB or CYMK production environments – from camera through production to display to final output. The system allows you to calibrate:
It also allows you to:
- Measure, mix and share and share: spot and PANTONE® colors
- Measure and evaluate flash and ambient light using the included ambient light head.
- Measure the color temperature of light booths
The i1Photo system includes:
- Accelerated i1Pro Spectrophotometer
- i1Match software for Mac & PC i1Share Software for Mac & PC (includes full Pantone® library)
- Mini ColorChecker Scanner profiling chart (reflectance)
- Ruler and backup board
- Carrying case for i1 components
- CRT/LCD monitor holder
- Ambient light measurement head
- Positioning target Calibration plate

Installation
I was a bit intimidated by the whole concept of managing color. I didn’t understand the concept, terminology or methodology involved in managing color. I reviewed the included Quick Start directions (unusual for me) and hooked up the i1Pro Spectrophotometer to the most accessible USB Port (on my keyboard) and started the installation process. The applications installed but when I tried running the i1Match software it told me that the system couldn’t work with the Spectrophotometer on an unpowered USB port–I switched to the powered USB port on my machine and the system found the device.
Monitor calibration

Next you “hang” the Spectrophotometer from the monitor. On an LCD monitor you use a base plate with a weight that hangs off the back of your monitor to balance the device on the monitor. In the easy mode, the system generates a set of colors on the screen and creates an ICC profile. In the advanced mode you set individual parameters including: screen contrast, individual RGB levels if available (RGB Presets if individual levels are not available and then the luminance point. The system then generates an ICC Profile–a neat feature is that it allows you to view a sample photo before and after calibration. The software also allows you to set a reminder for you to recalibrate the monitor and creates a graph of how your monitors profile is changing over time.
Printer calibration

pace. At the end of each line, let go of the button, wait for the beep and then move to the next line. The software will advise you if there are any errors and you need to rescan a line.
So is all this effort worth it? Yes! After calibrating the monitor and printer I can now soft proof my prints. I can accurately adjust color and light and shadow in Photoshop.
The i1Photo also allows you to create profiles for cameras–this requires studio lights and a target that doesn’t come with the kit. We will update the review when we have tested this.
i1Share
The i1Share application allows you to accurate scan any color with a click of the Spectrophotometer. Like the color palette used in a brochure? Click….click….click….now you can quickly convert it into Pantone colors, Photoshop, Illustrator or even a Microsoft Excel pallete. You can measure the spectral distribution of the ambient light or flash light, evaluate them against standard illuminations and transform the colors to evaluate them in different ambient illumination.
Conclusion
The i1Share system is an easy to use, and accurate system for calibrating various input and output devices in a photographers workflow. What differentiates it from less expensive systems? Two things: Accuracy and the number of devices that it can profile. The included Spectrophotometer allows you to create accurate profiles
for your monitor, printer, projector, camera, and even measure the ambient light you are viewing your photos with or the quality of your flash. What could be better? About the only thing that I think needs improvement is the documentation. While I muddled my way through by going through the included tutorials, online help and using Google better, more coherent documentation would have made it a lot easier. For example, it took me a while to figure out that I had to use the i1Share application to measure and compare ambient light. However, now that I’ve learned how to use the system it is a powerful tool for me to create accurate output of my photography.
